Version Control

I remember my first day as a technology intern and hearing people talk about version control, Git, SVN, and wondering what they were talking about. I had no idea what a repository was, or why would I care about being able to access someone else's code. It was all brand new to me, falling into it from a degree in Business and accidentally landing a role in tech.
I was determined to learn, and basically "fake it till I made it", so I went home and tried researching all things about Git. Starting with TortoiseGit I managed to learn the basics over time, and as long as I could clone, pull, add, commit and push then I was all good.
For the next few years, I then thought I was getting the hang of things, I was able to easily clone repositories, make my changes to a branch, commit them and push. I even moved to use the command line (this was big for me at the time). What more do you need?
If I had an issue, I was making small enough changes that I was just creating a new branch from main and starting again. I hadn't taken the time to learn a better way, because this was just the way I was taught.
Over the past couple of years, I've been learning a lot more about Git best practices and realising just how little I actually knew about using Git so I thought it was worth documenting some of the commands I've been getting used to and how it's increased my confidence. Even then, I know I'm only scraping the surface.
Patching
When you're adding a change to be committed, it's easy to get into the habit of running git add -A to just add all the things. However, doing so means it's so easy to accidentally commit something that you didn't mean to.
For the longest time now however, I've been relying on patching. It's almost the same command, only you can be more intentional with the changes you're going to commit:
git add -p
By using this command, you can iteratively select the changes you want to make. This has saved me from accidentally commiting incorrect blank spaces, YAML travesties, or by realising "oh wait, I only did that for a test, I don't really want that change". It allows you to stage or unstage each "hunk" by iteratively going through all the changes, showing you the diff, and prompting you for a response of y for yes, n for no, and a variety of other options that I haven't really looked into honestly.
This also works if you want to iteratively undo changes, by running:
git checkout -p
I sometimes find myself doing this when my editor wants to automatically change double quotes to single for example, and I don't want that to be included in a functional change.
Note: patch doesn't work for brand new files, you do still need to run a git add <file-name> to add them.
I'll then always do git status to check that I haven't missed anything before proceeding.
Commit Messages
I know that I'm not the only one who is guilty of getting lazier with my commit messages over time when I'm debugging something. Particularly when I need CI to run my tests, or I'm trying to configure new workflows. It's really easy to build up many commits with less than meaningful commits: test, testing, work please, fixing a bug, typo, ohno, Y U NO WORK, oh my bad.
It happens, but when you're raising a pull request, you might want to consider tidying up all those commits and I've only recently found that there's a simple way to do this. 🤯
Commit messages should be meaningful: think of the future you, trying to investigate why something isn't working as expected, and all you've got to work with when looking back at the history is "test fix for bug", it's going to add a lot of time to your debugging. It's possible to apply rules to your repository that enable Jira formatting or other requirements, but often I still find these are not enough.
Commit messages that provide context can be time-consuming, but taking the time to do it right can make things much easier long term. For example:
ci: Add separate workflow for integration tests

I added <functionality> because <why is this important>.

This was done instead of <other options> for <reasons>.
The first line acts as the "header" and should provide a summary of your change. I often prepend my commits with the type of change it is, i.e. ci, dev, tests, prod to give an indicator of what type of functional change it is. I usually then try to explain the functionality I've added, and the context for why this change is important. If there were alternative approaches I disregarded, I usually include them too. I can't even begin to explain the number of times I have seen commits from past team members that have saved hours in duplicate effort because all the context is there in the commit message.
I've had the pleasure to work with Dan, who has been commended many times for his commit practices; and someone else has already written a post about their favourite commit message (which is one of Dan's) which summarises all of this much better than I could.
Rebasing isn't actually so bad
I would love to go back to some of the projects I've worked on over the years and cringe at the commit history, to see the spaghetti that it turned out to be (hence the cover photo). I expect it would be a thing of art and chaos, in that I expect there to be many, many woven commits and no clear way to distinguish what's going on.
But the thing is, I was always scared to rebase because I expected I would break everything. So it was much "easier" to just merge, deal with the conflicts, recommit and move on. I've since been getting over my fear of rebasing and you know what, it's not actually that bad. There are just a handful of commands to run.
If you're working on a feature branch and your colleague has merged their latest changes in the main branch (or another branch you need changes from), first of all, you'll need to fetch the latest changes from the repo. In general, this is a good practice even if you're not aware of any new changes in the repo:
git fetch -a
Once you've fetched the latest changes, it is as simple as:
git rebase -i origin/main
This command will let you interactively rebase your changes on top of the main branch, showing all of the options you can use for each change. The commands I regularly use include: pick, reword, squash and fixup. An example of what this looks like is below. Simply edit this file by doing EXIT + i and changing the word at the start of the line to your chosen command.
pick ae7256c This is an example commit

# Rebase 7677657..ae7256c onto 7677657 (2 commands)
#
# Commands:
# p, pick <commit> = use commit
# r, reword <commit> = use commit, but edit the commit message
# e, edit <commit> = use commit, but stop for amending
# s, squash <commit> = use commit, but meld into previous commit
# f, fixup <commit> = like "squash", but discard this commit's log message
# x, exec <command> = run command (the rest of the line) using shell
# b, break = stop here (continue rebase later with 'git rebase --continue')
# d, drop <commit> = remove commit
# l, label <label> = label current HEAD with a name
# t, reset <label> = reset HEAD to a label
# m, merge [-C <commit> | -c <commit>] <label> [# <oneline>]
# .       create a merge commit using the original merge commit's
# .       message (or the oneline, if no original merge commit was
# .       specified). Use -c <commit> to reword the commit message.
#
# These lines can be re-ordered; they are executed from top to bottom.
This command will append your changes to the top of the main branch as if you had created your branch directly from the latest changes on main. It will look as if it hasn't diverged, which means you've reduced the amount of branches running in parallel in the commit history. This is a much cleaner approach than merging.
Once you've rebased, you're likely going to want to do a git status to find that there is a complaint that your branch and the origin branch has diverged, and that's okay. Because right now, the origin branch has no idea you've rebased. Instead of doing a git pull like it suggests, you're going to want to force push:
git push origin <branch-name> --force-with-lease
I generally use the --force-with-lease tag as it is a much safer option than just --force because it will not override any work on the remote branch if more commits were added to that branch from your teammates.
Fixup
I like to keep commits related to specific changes, so that if necessary I can revert just one change and keep the rest, i.e. if I'm modifying CI config and a helm chart, and the two changes are related but different I would sometimes break these out into separate commit messages, that also make it clear where I'm making my changes, for example:
ci: Add new job for test-against-productionvalues: set minReplicas to 10
However, most of what I've been doing lately involves YAML. So it's not unusual to find myself needing to modify (or fixup) one of those changes to fix a space. That kind of fix should live within the first commit, so my current process involves:
- Adding the change using git patch by using
git add -p - Running
git logto grab the commit SHA for the commit I want to fix. - Then fixing the commit, using:
git commit --fixup <commit-SHA> - To retain a clean history, you then need to rebase, so I would do a rebase with autosquash, like:
git rebase -i origin/main --autosquash(autosquash will do the heavy lifting for your fixup). - You can confirm everything looks as expected with
git logagain. You should see that the fixup commit is gone, but your change has been added to the commit you just "fixed up". - Then, if you had already pushed remotely, you will need to force push, by running the following:
git push origin <branch-name> --force-with-lease
Following these practices, and getting more familiar with them can make your development experience better long term.
These are only a handful of practices that I now use, and I haven't even scratched the surface on many of magical things you can actually do with Git.
Oh Sh!# Git
I've recently learned about https://ohshitgit.com/ which has been added to my bookmarks, and definitely going to be kept handy for any future times when I've messed up. Because sometimes these things are tough.
There is also a PC version if you're not a fan of swearing: https://dangitgit.com/en
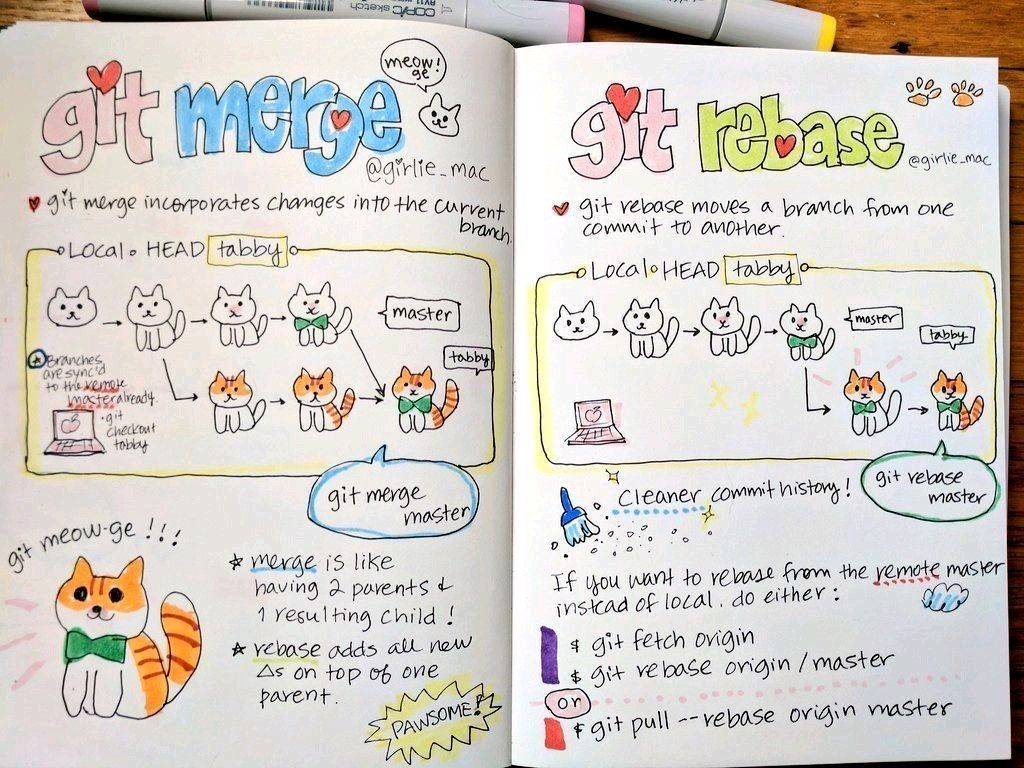
Explaining Git with Cats
I stumbled across these images a while back, and as a visual learner I appreciated the illustrations from Tomomi Imura on girliemac.com:
Think of anything else that is part of your development process?
Let me know, I'd love to learn!
Donna